This article will explain to you how to set up and configure your email client in order to work and communicate with our mail servers in order to send and receive emails.
Microsoft Office's Outlook allows for emails to be sent and received through both the POP3 and IMAP protocol. The screenshots for these guides are taken on Outlook 2016 and 2019, however most of the settings should be the same.
Your IMAP email account will now be set up to work with Outlook.
Your POP3 email account will now be set up to work with Outlook.
In order to set up IMAP...
- When you open Outlook for the first time, it will prompt you to set up an email account.
- If it's your first time opening Outlook, please watch the following video for setup instructions.
- If you have problems with the automatic setup in Outlook, please watch the following video for the Manual setup process.
- If it's your first time opening Outlook, please watch the following video for setup instructions.
Your IMAP email account will now be set up to work with Outlook.
In order to set up POP3...
- Depending on if it's your first time opening Outlook, your setup may take a mildly different route, follow the applicable method.
- If it's your first time opening Outlook, you'll be prompted with a screen that looks similar to what's pictured below, select Manual setup or additional server types and click next, proceeding to step 2 in this guide.
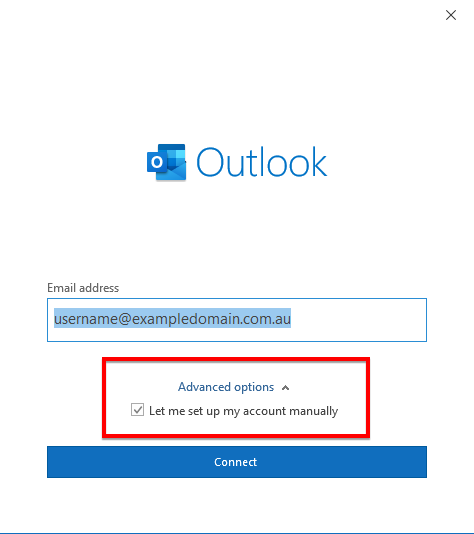
- If it's your first time opening Outlook, you'll be prompted with a screen that looks similar to what's pictured below, select Manual setup or additional server types and click next, proceeding to step 2 in this guide.
- If this isn't your first time opening Outlook, click File, and then click Add Account, then proceed to step 2 in this guide.
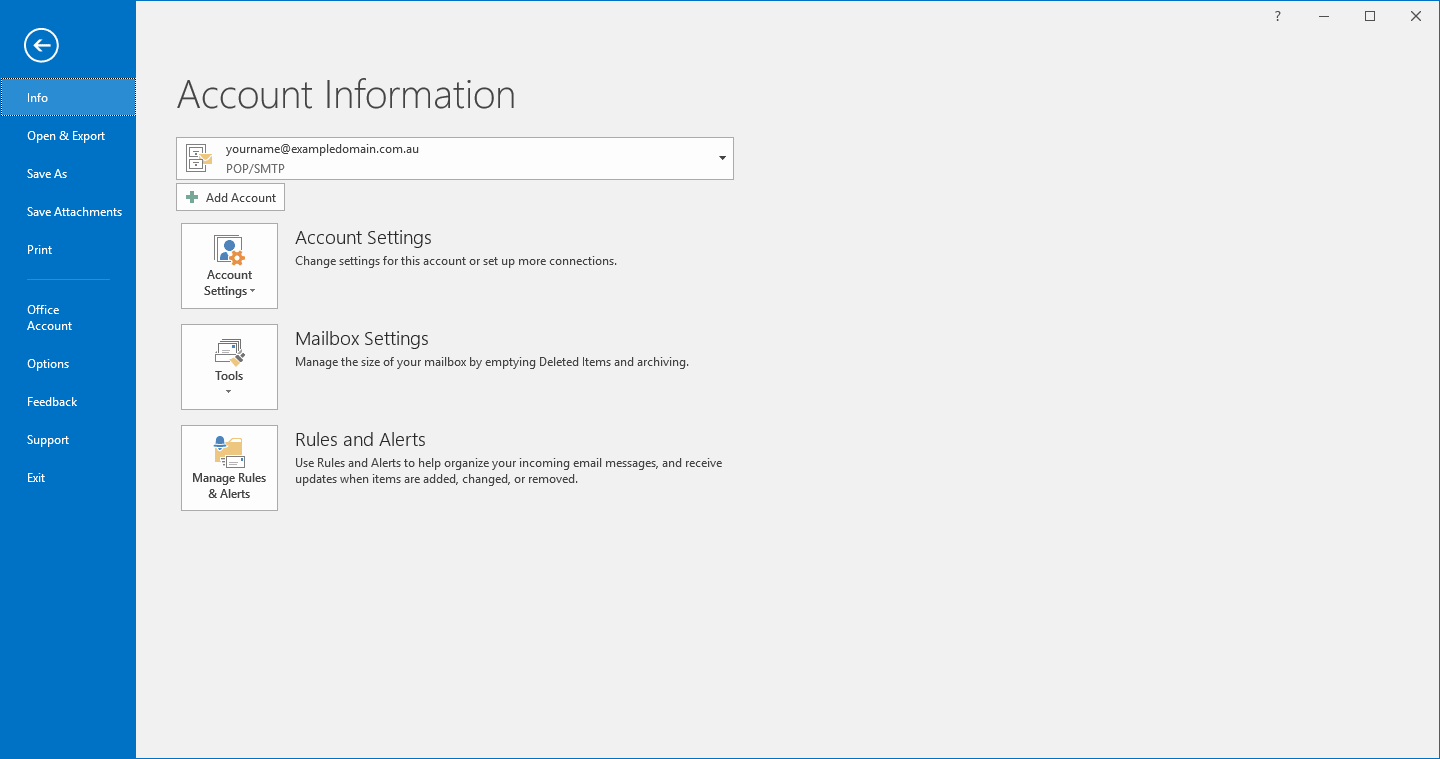
- If this isn't your first time opening Outlook, click File, and then click Add Account, then proceed to step 2 in this guide.
- Select POP or IMAP for service type, and click next.

- Select POP or IMAP for service type, and click next.
- Select POP3 and fill out the incoming/outgoing mail server option, replacing exampledomain.com.au with your own domain name. Ensure that your username under the Logon Information subheading has the domain name at the end. When this is all filled out, click More Settings.
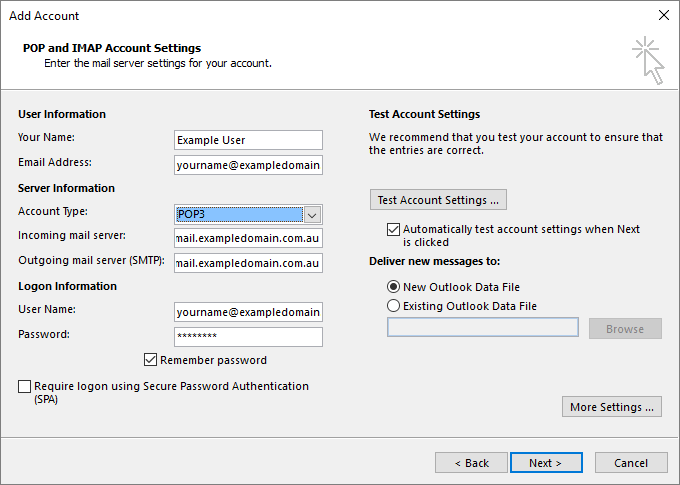
- Select POP3 and fill out the incoming/outgoing mail server option, replacing exampledomain.com.au with your own domain name. Ensure that your username under the Logon Information subheading has the domain name at the end. When this is all filled out, click More Settings.
- In More Settings, open the Outgoing Server tab and check My outgoing server (SMTP) requires authentication, and select Use same settings as my incoming mail server. Proceed to open the Advanced tab.

- In More Settings, open the Outgoing Server tab and check My outgoing server (SMTP) requires authentication, and select Use same settings as my incoming mail server. Proceed to open the Advanced tab.
- When in the Advanced tab, select Auto under Use the following type of encrypted connection, and then proceed to change the Outgoing server port from 25 to 587. Click Ok, and then click Next.
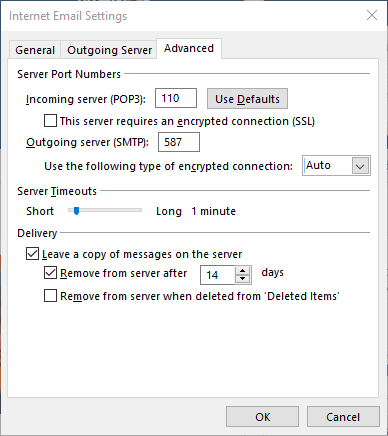
- When in the Advanced tab, select Auto under Use the following type of encrypted connection, and then proceed to change the Outgoing server port from 25 to 587. Click Ok, and then click Next.
- Provided everything is done correctly, you'll be prompted with a screen that looks similar to below, click Yeswhen the certificate error appears, and then click Close when both tests have completed successfully.
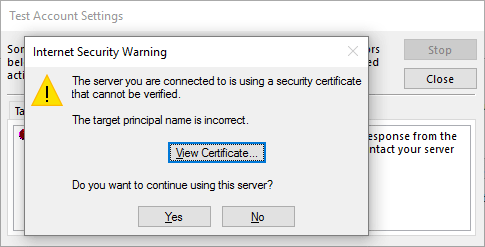
- Provided everything is done correctly, you'll be prompted with a screen that looks similar to below, click Yeswhen the certificate error appears, and then click Close when both tests have completed successfully.
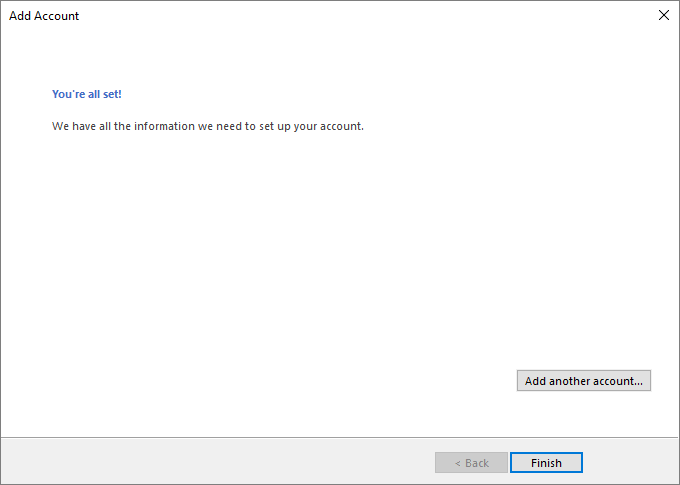
- When the tests have completed, you'll be presented with a screen as pictured below, and your account will now be ready to be used.
Your POP3 email account will now be set up to work with Outlook.
Mozilla's Thunderbird has the capabilities to send and receive emails through both the IMAP and POP3 protocol utilising our servers. Follow this guide in order to set Thunderbird up to do this. These screenshots are taken on Thunderbird
Your IMAP account will now be set up to work with Thunderbird.
Your email account will now be set up to work with Thunderbird.
In order to set up IMAP...
- Depending on if this is your first time using Thunderbird or you have a pre-existing account on Thunderbird, your process may vary. Follow the applicable one to you.
- If this is your first time using Thunderbird, you'll be greeted with a screen similar to that pictured below, click Skip this and use my existing email and proceed to step 2 of this guide.
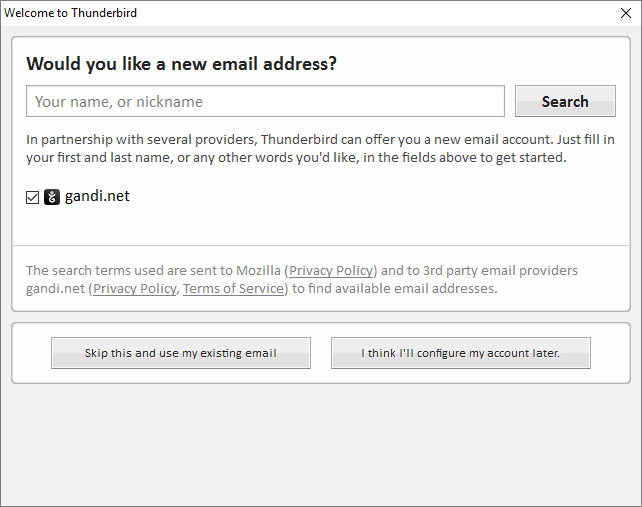
- If this is your first time using Thunderbird, you'll be greeted with a screen similar to that pictured below, click Skip this and use my existing email and proceed to step 2 of this guide.
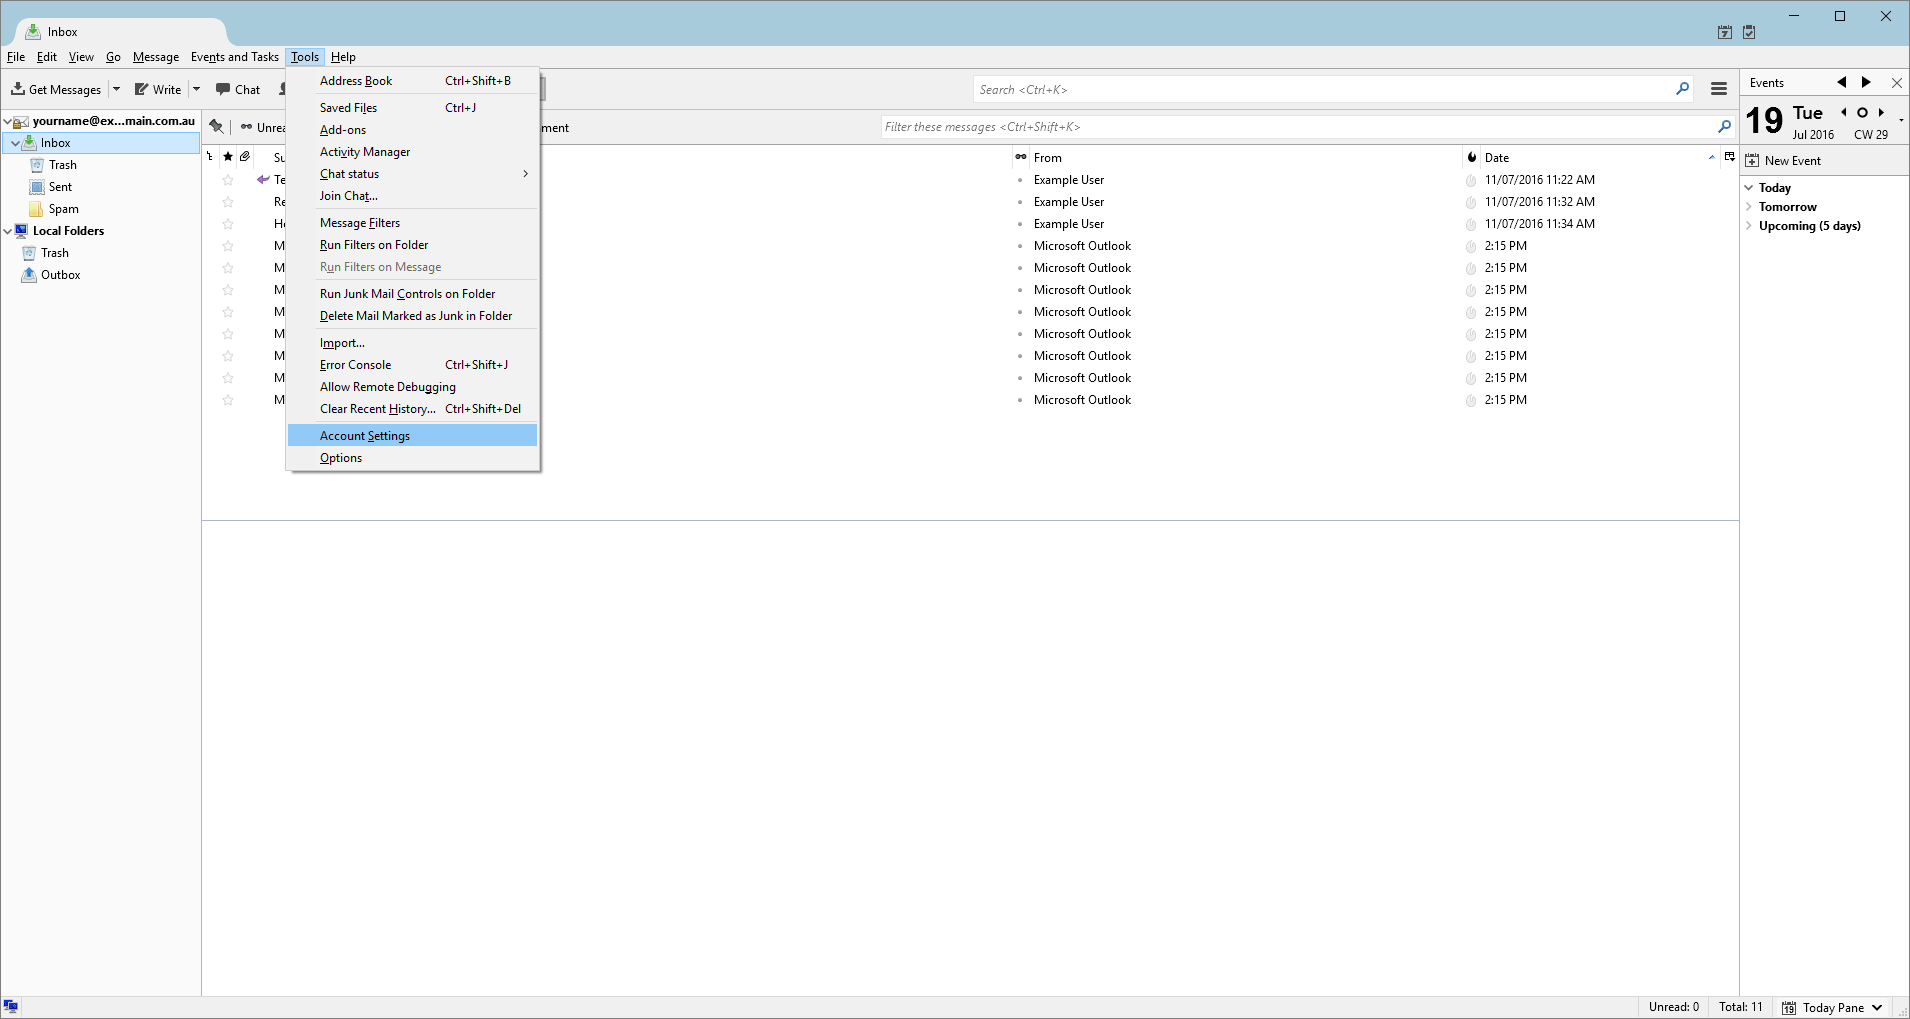
- If this isn't your first time using Thunderbird, go into Tools and then select Account Settings in the Menu bar, accessed by pressing the Alt key...
...and then click Account Actions and Add Mail Account and proceed to step 2 of this guide.
- If this isn't your first time using Thunderbird, go into Tools and then select Account Settings in the Menu bar, accessed by pressing the Alt key...
- Fill out your details on the screen, which should be similar to that pictured below.

- Fill out your details on the screen, which should be similar to that pictured below.
- After clicking next, Thunderbird will by default attempt to test commonly known mail servers, click Manual config.
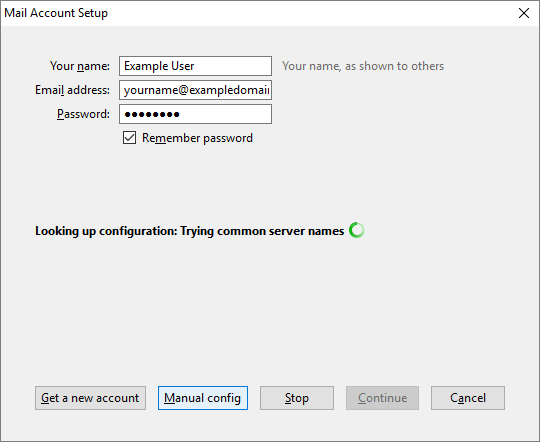
- After clicking next, Thunderbird will by default attempt to test commonly known mail servers, click Manual config.
- Fill out the settings below, ensuring Username has the domain name at the end of the username. Replace exampledomain with your domain name. When completed, press Re-test and confirm your settings. Once the test is completed, press done.
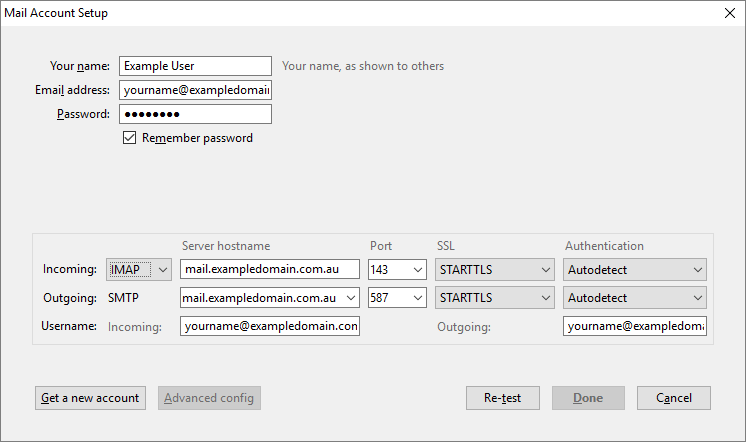
- Fill out the settings below, ensuring Username has the domain name at the end of the username. Replace exampledomain with your domain name. When completed, press Re-test and confirm your settings. Once the test is completed, press done.
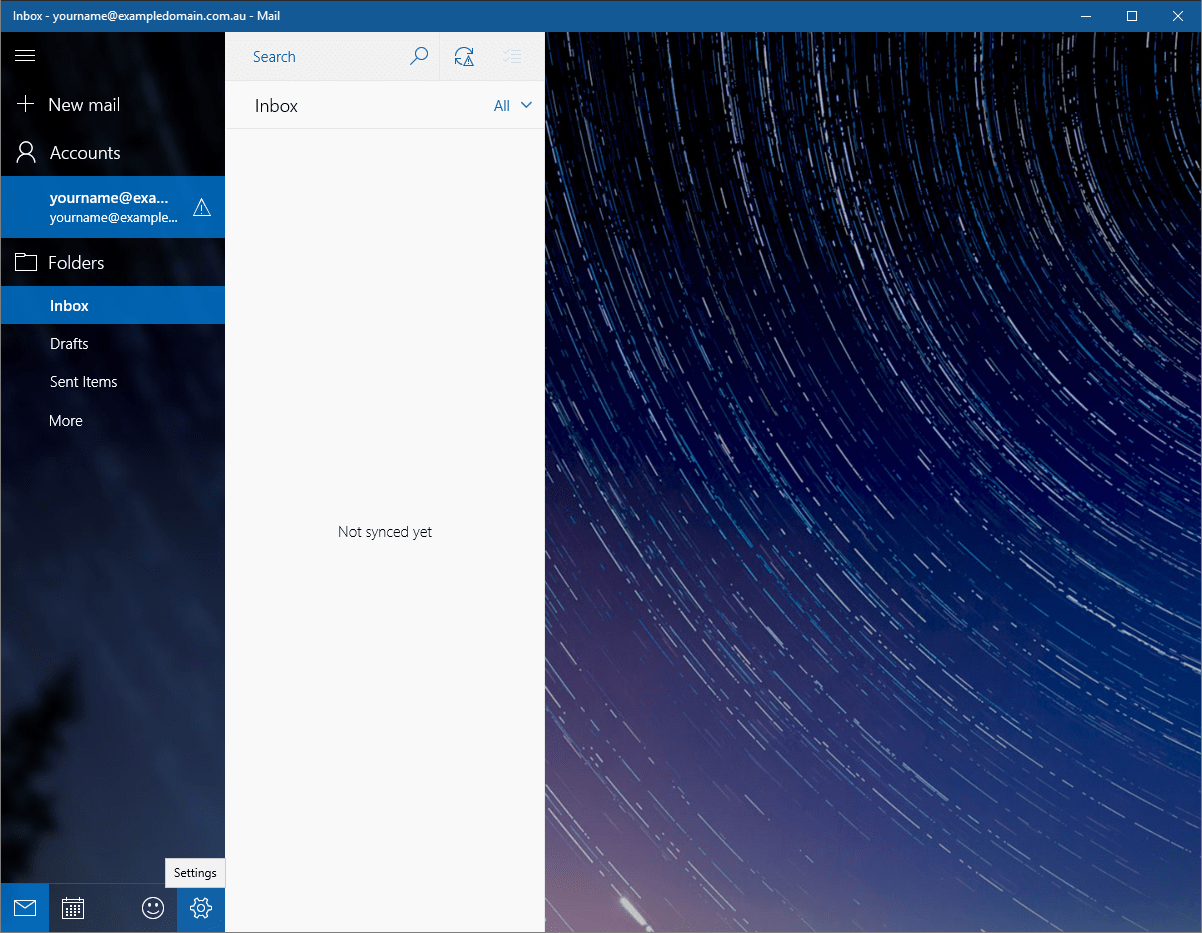
- After pressing done, you'll be brought to Thunderbird's inbox page. The mail should automatically be downloaded from the server, however if it isn't downloading, press Get Messages

Your IMAP account will now be set up to work with Thunderbird.
In order to set up POP3...
- Depending on if this is your first time using Thunderbird or you have a pre-existing account on Thunderbird, your process may vary. Follow the applicable one to you.
- If this is your first time using Thunderbird, you'll be greeted with a screen similar to that pictured below, click Skip this and use my existing email and proceed to step 2 of this guide.
- If this is your first time using Thunderbird, you'll be greeted with a screen similar to that pictured below, click Skip this and use my existing email and proceed to step 2 of this guide.
- If this isn't your first time using Thunderbird, go into Tools and then select Account Settings in the Menu bar, accessed by pressing the Alt key...
...and then click Account Actions and Add Mail Account and proceed to step 2 of this guide.
- If this isn't your first time using Thunderbird, go into Tools and then select Account Settings in the Menu bar, accessed by pressing the Alt key...
- Fill out your details on the screen, which should be similar to that pictured below.
- Fill out your details on the screen, which should be similar to that pictured below.
- After clicking next, Thunderbird will by default attempt to test commonly known mail servers, click Manual config.
- After clicking next, Thunderbird will by default attempt to test commonly known mail servers, click Manual config.
- Fill out the settings below, ensuring Username has the domain name at the end of the username. Replace exampledomain with your domain name. When completed, press Re-test and confirm your settings. Once the test is completed, press done.

- Fill out the settings below, ensuring Username has the domain name at the end of the username. Replace exampledomain with your domain name. When completed, press Re-test and confirm your settings. Once the test is completed, press done.
- After pressing done, you'll be brought to Thunderbird's inbox page. The mail should automatically be downloaded from the server, however if it isn't downloading, press Get Messages
Your email account will now be set up to work with Thunderbird.
- Depending on if it's your first time opening Windows 10 Mail, your setup may take a mildly different route, follow the applicable method.
- If this is your first time setting up Windows 10 Mail, you'll be greeted with a screen similar to that pictured below. Click on Add account and proceed to step 2 in this guide.

- If this is your first time setting up Windows 10 Mail, you'll be greeted with a screen similar to that pictured below. Click on Add account and proceed to step 2 in this guide.
- If this isn't your first time opening Windows 10 Mail, click the Settings gear...
...then click Manage Accounts...
...then click Add account then proceed to step 2 in this guide.
- If this isn't your first time opening Windows 10 Mail, click the Settings gear...
- Select Advanced set-up.

- Select Advanced set-up.
- Select Internet email as the kind of account.

- Select Internet email as the kind of account.
- Fill out the fields on the next screen, selecting your Account type, either POP3 or IMAP4. For Username, ensure that your full email including domain name is filled out. The Account name is a tag for the account, and can be whatever you wish for it to be (for example, Webworx). The Account type dictates which protocol the application will use to send and deliver your emails. Click Sign in when your account details are filled out.
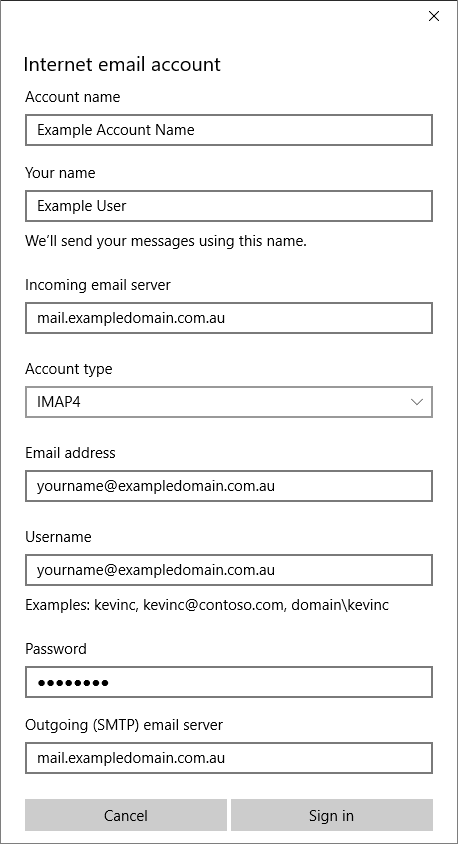
- Fill out the fields on the next screen, selecting your Account type, either POP3 or IMAP4. For Username, ensure that your full email including domain name is filled out. The Account name is a tag for the account, and can be whatever you wish for it to be (for example, Webworx). The Account type dictates which protocol the application will use to send and deliver your emails. Click Sign in when your account details are filled out.
- Mail will confirm your account details on the next screen, click Done.
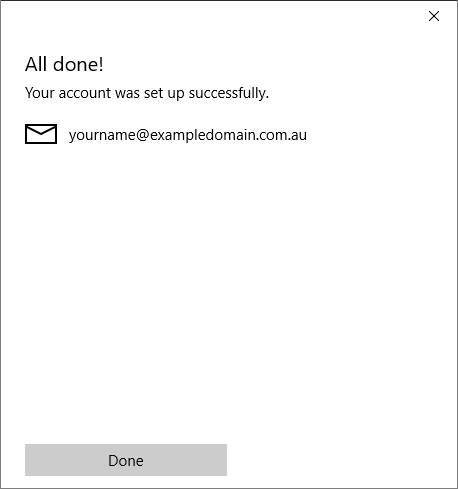
- Mail will confirm your account details on the next screen, click Done.
- Click on the refresh button to begin the fetch of your mailbox.
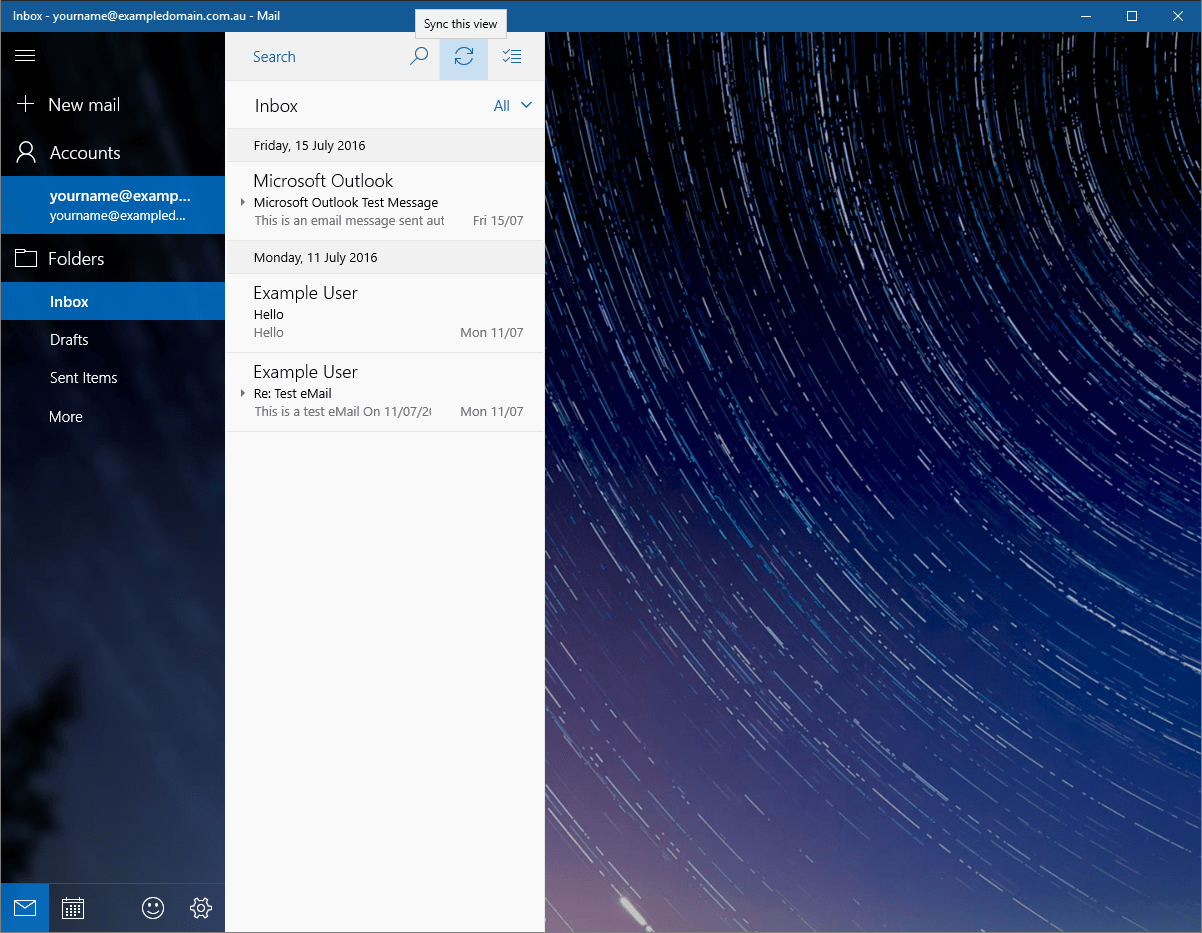
- Click on the refresh button to begin the fetch of your mailbox.
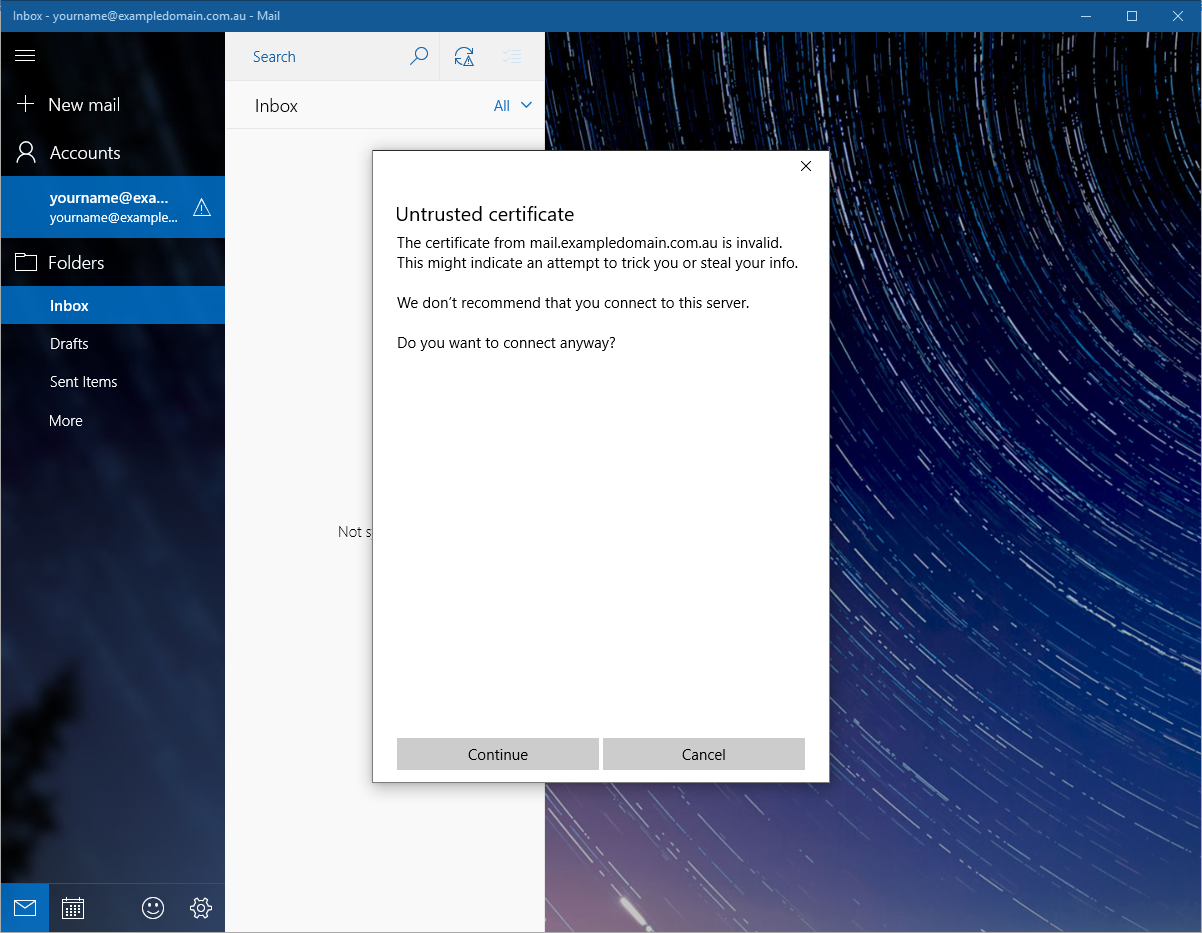
- In the situation that a certificate error comes up as pictured below, accept the certificate and your mailbox should fetch from the servers.
Your email account will now be set up to work with Windows 10 Mail.
- When on your home screen, open the Settings application.
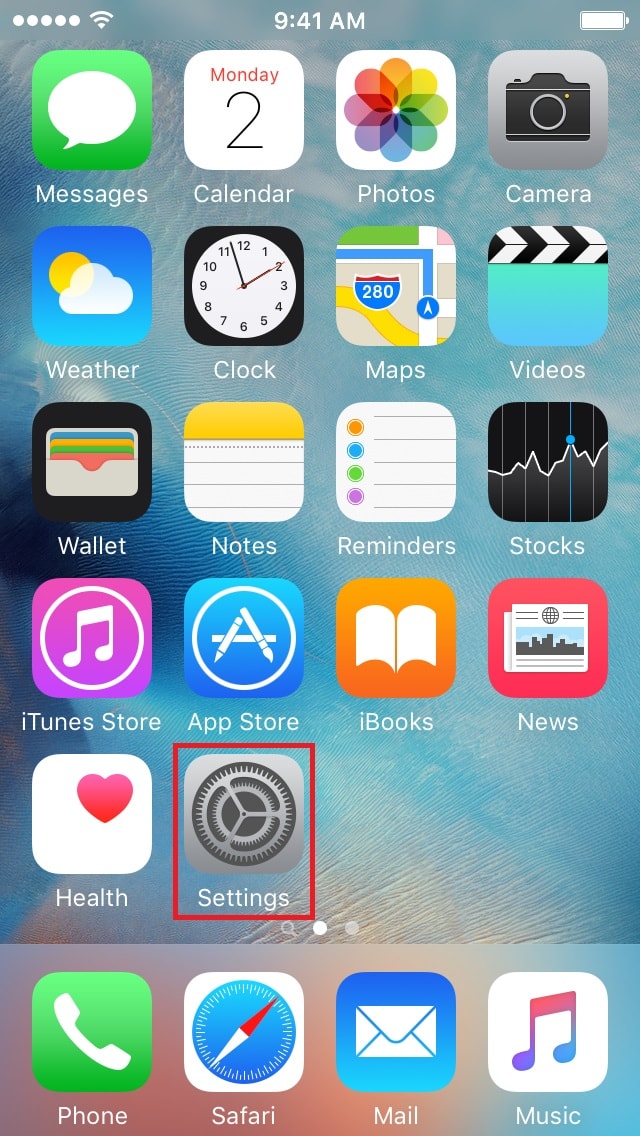
- When on your home screen, open the Settings application.
- Scroll down, finding the Passwords & Accounts option.
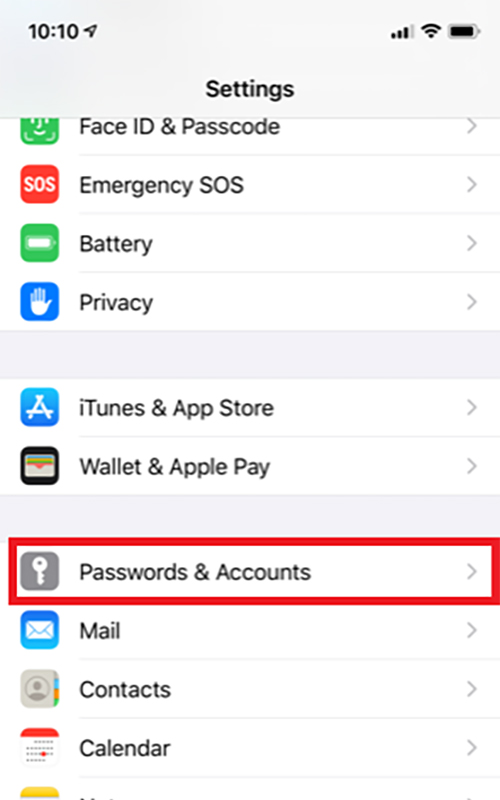
- Scroll down, finding the Passwords & Accounts option.
- Under the Accounts subheading, press Add Account.
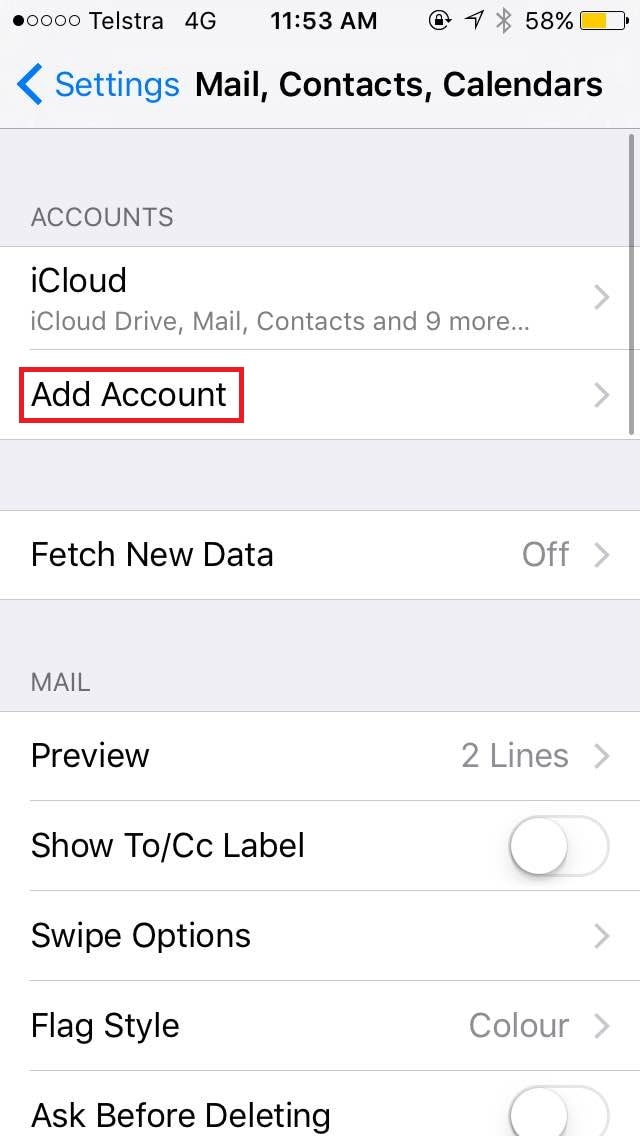
- Under the Accounts subheading, press Add Account.
- When prompted as to what account type, press Other.

- When prompted as to what account type, press Other.
- In the Other menu, tap on Add Mail Account.
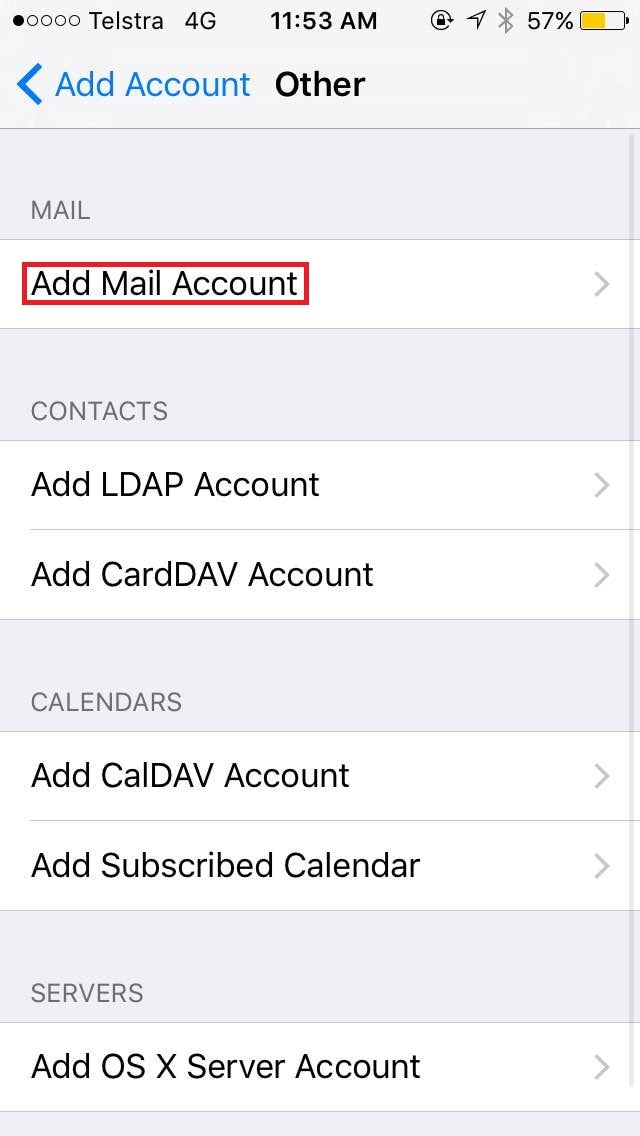
- In the Other menu, tap on Add Mail Account.
- Fill out your email account settings in the fields provided, and then proceed.
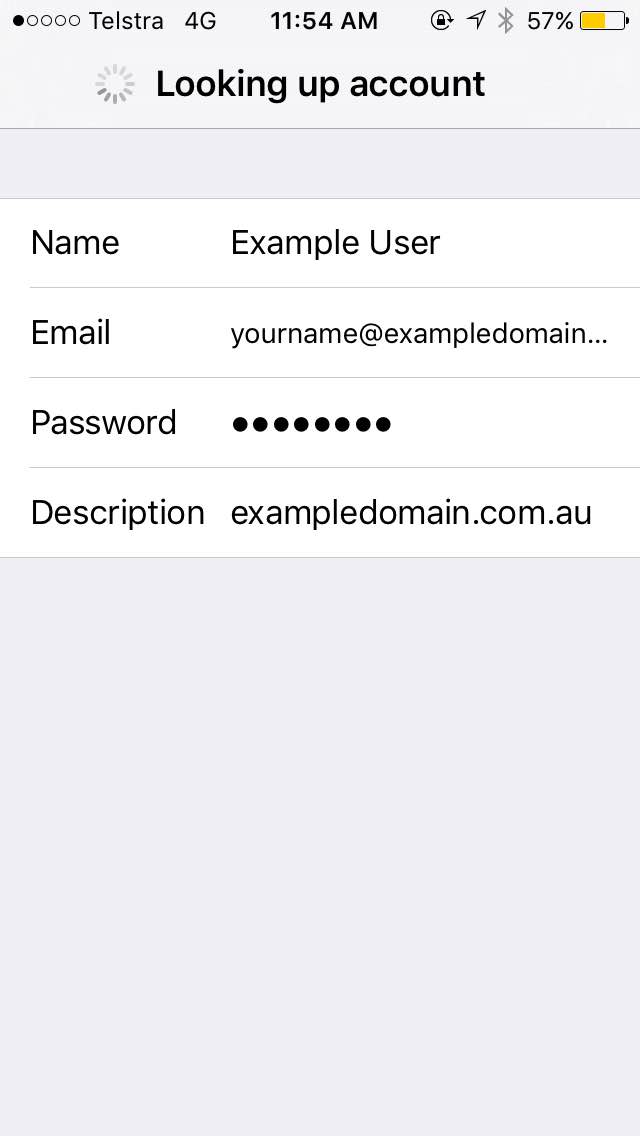
- Fill out your email account settings in the fields provided, and then proceed.
- When prompted to enter the Mail Server settings, input as follows, replacing exampledomain.com.au with your own domain name. Select the account type you want up the top, being either IMAP or POP3.
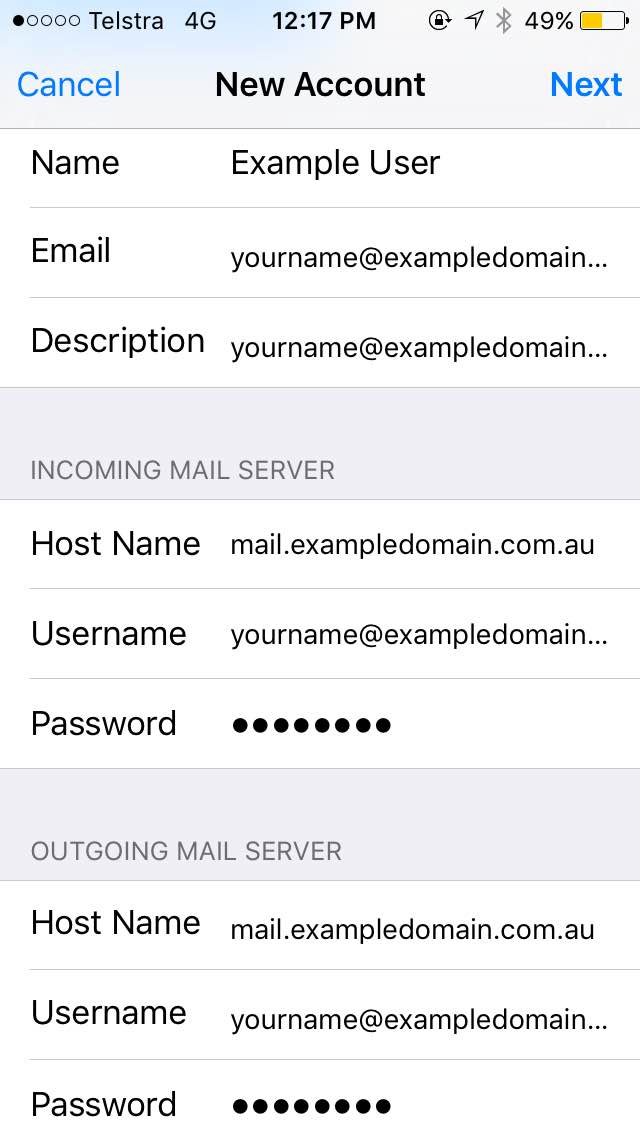
- When prompted to enter the Mail Server settings, input as follows, replacing exampledomain.com.au with your own domain name. Select the account type you want up the top, being either IMAP or POP3.
- After hitting next, you will be prompted to accept the server's security certificate, press continue.
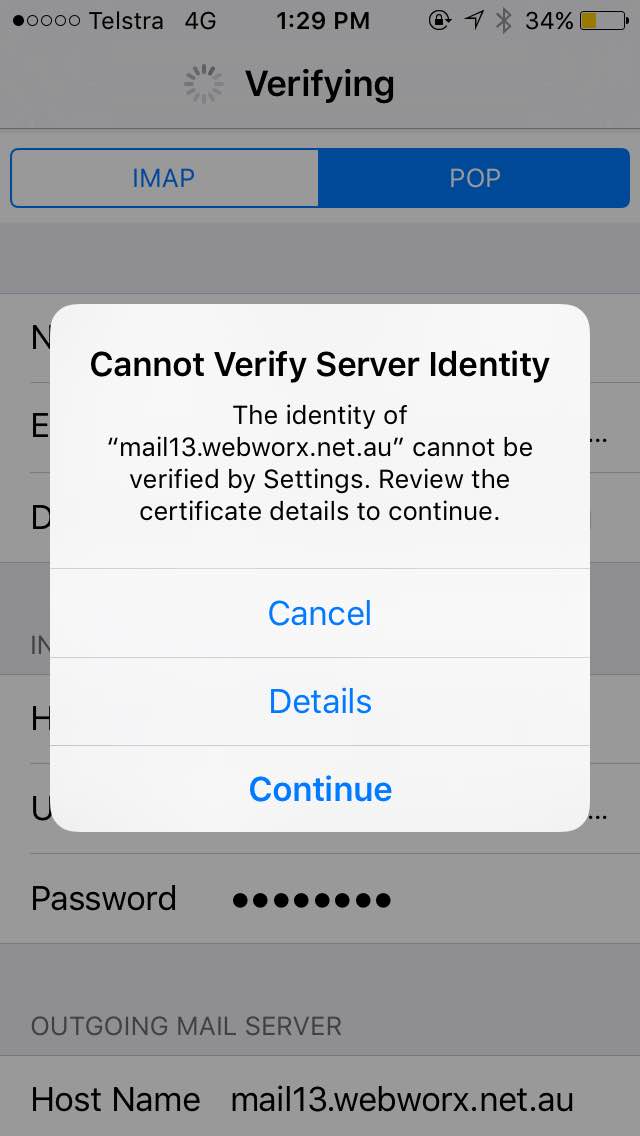
- After hitting next, you will be prompted to accept the server's security certificate, press continue.
- Select the items you wish to sync with the server. Once done, tap Save.

- Select the items you wish to sync with the server. Once done, tap Save.
- When brought back to the account page, tap on the newly added account; in this example exampledomain.com.au.
- When brought back to the account page, tap on the newly added account; in this example exampledomain.com.au.
- For POP3, it'll take you straight to Account Settings, similar to the fields you put in prior. For IMAP, tap on Account.

- For POP3, it'll take you straight to Account Settings, similar to the fields you put in prior. For IMAP, tap on Account.
- When in Account Settings, tap on SMTP.

- When in Account Settings, tap on SMTP.
- Select the Primary Server; in this example mail.exampledomain.com.au.

- Select the Primary Server; in this example mail.exampledomain.com.au.
- Alter the Server Port to 587. If it is already set as 587, leave it as this and press Done.

Your email account will now be set up on your iPhone and will be able to send and receive emails.
The screenshots for this guide is taken on Mac OS X El Capitan, using Mac Mail version 9.3. Some settings may vary.
- Open up Mac Mail.
- Open up Mac Mail.
- If it's your first time opening Mac Mail, proceed to step 2 in this guide.
- If this isn't your first time opening Mac Mail, click Mail, and then click Add Account..., then proceed to step 2 in this guide.
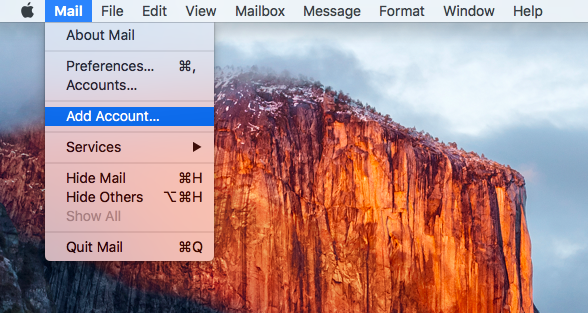
- If this isn't your first time opening Mac Mail, click Mail, and then click Add Account..., then proceed to step 2 in this guide.
- When prompted to choose a mail account provider, select Other Mail Account.
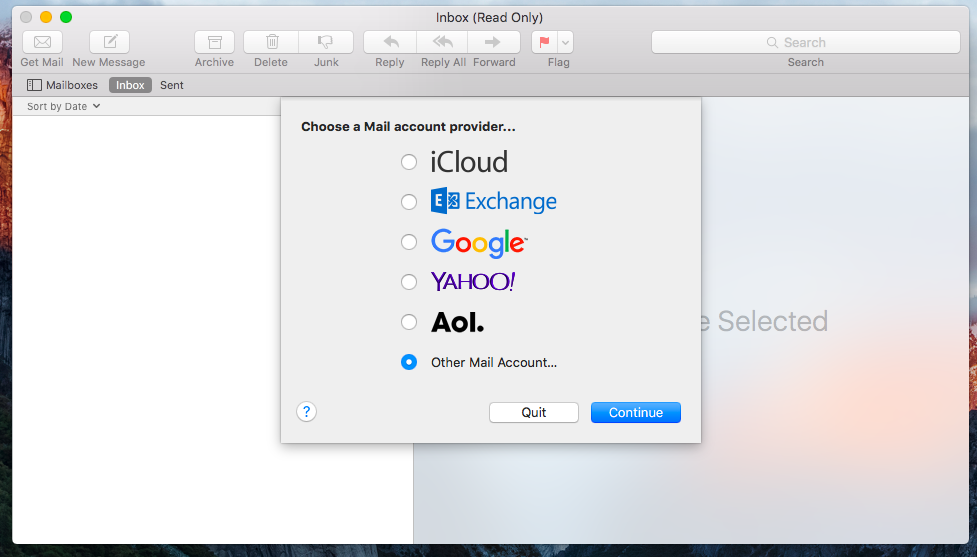
- When prompted to choose a mail account provider, select Other Mail Account.
- Input your login details on the next screen.
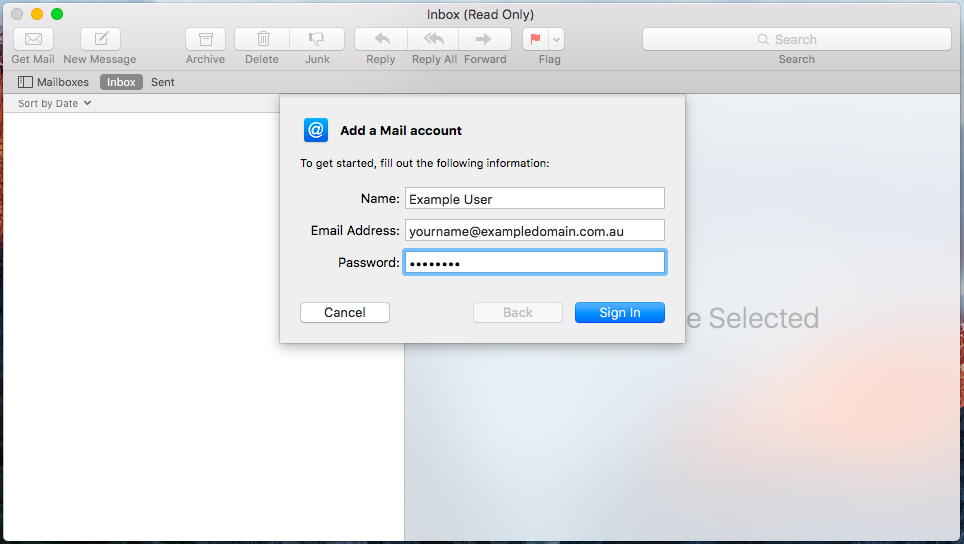
- Input your login details on the next screen.
- You'll be brought to another screen asking for account details, fill them out, ensuring your username has the full domain name; for example as in the screenshot @exampledomain.com.au. Select your Account Type in the field, being either IMAP or POP3, and once all details are correct click Sign In.
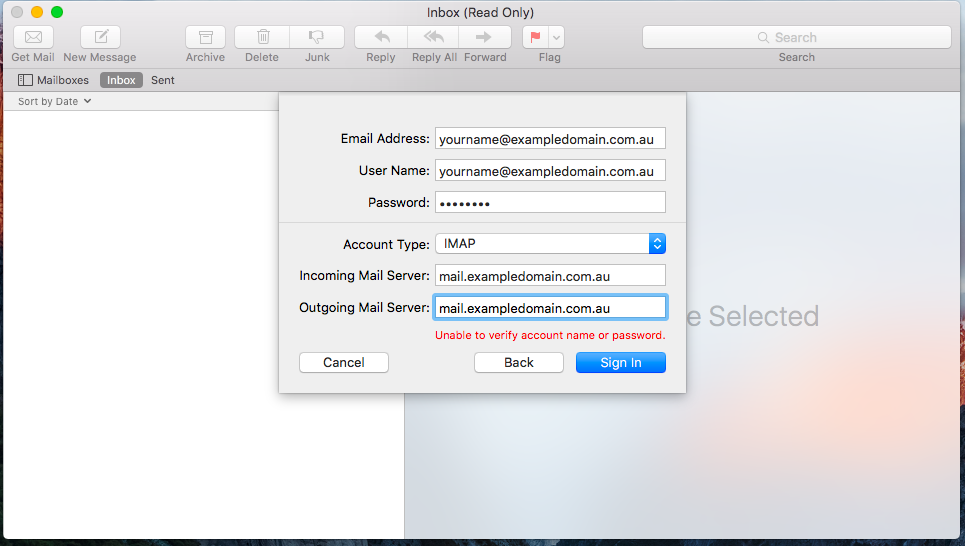
- You'll be brought to another screen asking for account details, fill them out, ensuring your username has the full domain name; for example as in the screenshot @exampledomain.com.au. Select your Account Type in the field, being either IMAP or POP3, and once all details are correct click Sign In.
- You'll be faced with a certificate error, click Continue.
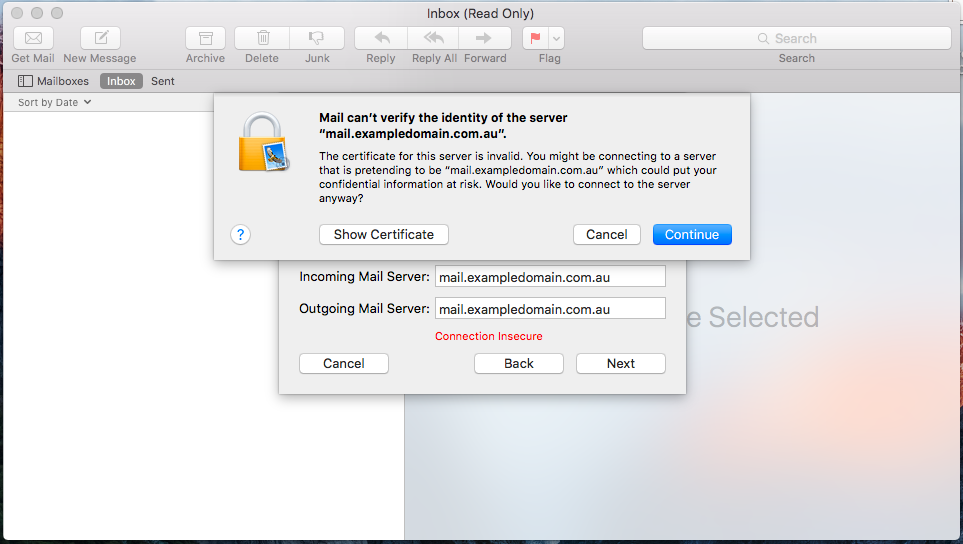
- You'll be faced with a certificate error, click Continue.
- You'll be asked what apps you want to use with this account. Select the apps you want and click Done.
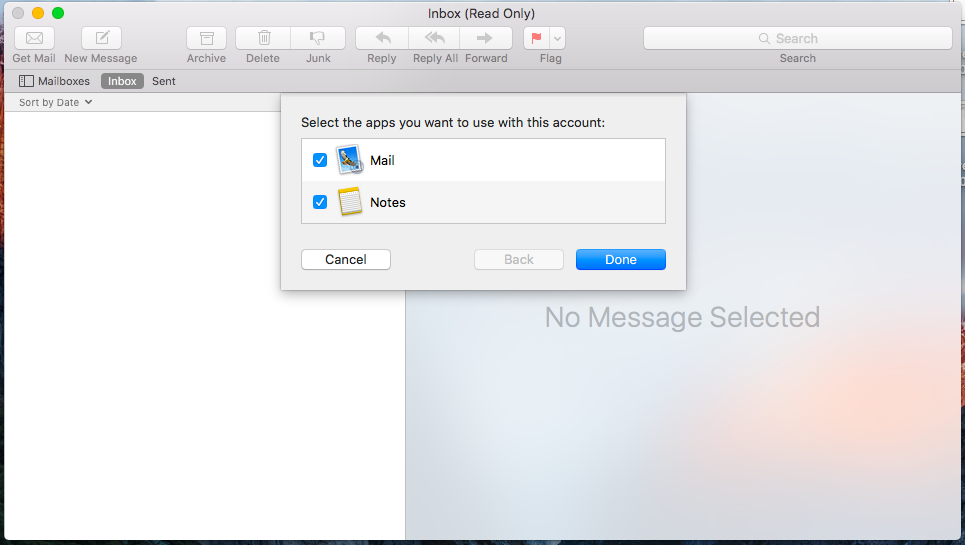
- You'll be asked what apps you want to use with this account. Select the apps you want and click Done.
- Another certificate error will appear, click Contine and your emails should now fetch.
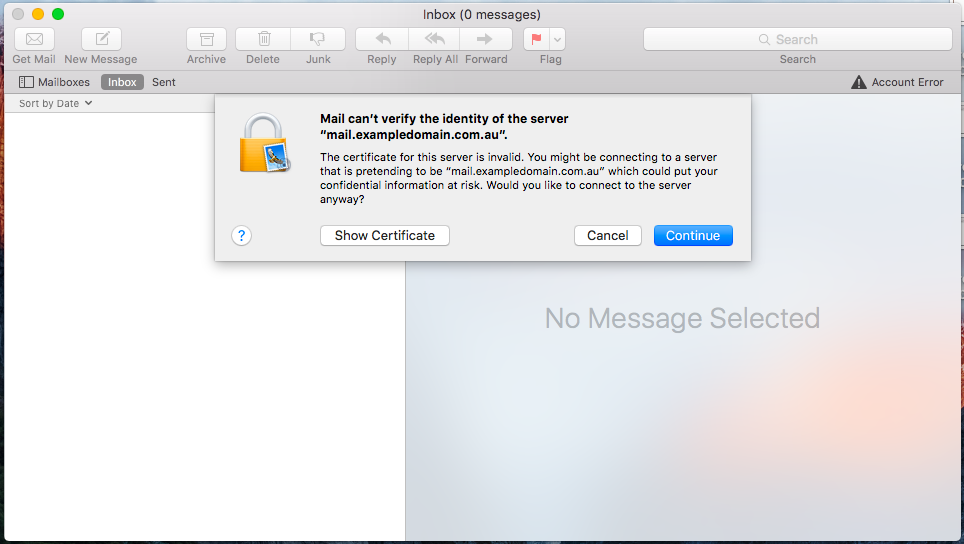
- Another certificate error will appear, click Contine and your emails should now fetch.
Your email account will now be configured for use on your Mac's native mail client.
